

OK, so who here has ever noticed their beautiful images looking terrible on social media?
Perhaps you’ve spent an hour or so perfecting, polishing and carefully nurturing a collection of images in Lightroom or Photoshop. You get them looking amazing. Excited to share them with your community, you visit your preferred social media platform where you upload them to your gallery.
You eagerly wait for the 100% upload successful message.
Feeling proud and accomplished, you head into your own profile to check your gallery, one last time, before the likes and comments start rolling in. And to your horror, your once perfect images look 50 shades of wrong. The colours are out, the images are somewhat blurry and “Oh My! What is all that pixelation!?”
Frustrating, right? Absolutely!
It’s moments like these that get you questioning why you even bothered to spend the time editing your images in the first place. Heart-breaking stuff.
[twenty20 img1=”1466″ img2=”1467″ offset=”0.5″]“Why does this happen? My images look bright, sharp and beautiful in Lightroom, so how I you get them to look just as good online?”
I get it. You just want to be able to craft amazing work, share your high-resolution images, present them at their best and not have to worry about anything else.
Sadly, if each of the (almost) 2 billion images that get uploaded to the internet every single day were glorious high-resolution files, it would reduce the speed of the internet to snail pace and cost social media companies a lot more for storage space.
Therefore, it’s no surprise online platforms try to optimize storage space and performance wherever they can. For us photography types, this means our beautiful images are the first to be sacrificed.
[twenty20 img1=”1469″ img2=”1470″ offset=”0.5″]Companies like Facebook, Flickr and Instagram apply a compression algorithm to your images when you upload them to your galleries.
Essentially, they grab your carefully edited image and, without care for the world (or your sanity), they throw it into their algorithm (which I imagine resembles a giant wood chipper). The algorithm gets to work, stripping away as much information as it can to reduce the file size. Typically, the algorithm will spit out a fuzzier, pixilated and lower quality version of your image. Wonderful.
Fortunately, there are ways to minimise the effects of these compression algorithms from completely destroying your photos, so your images can look just as good on social media as they do in your Lightroom Library.
[twenty20 img1=”1471″ img2=”1472″ offset=”0.5″]Image Optimization
Luckily, social media platforms make their ‘optimum image resolution information’ accessible to the public. This information serves as a guide to help you publish your photos to get the best possible quality (and make their platform look amazing) whilst saving them space. A sort of ‘let’s compromise, so we get the best of both worlds’ agreement.
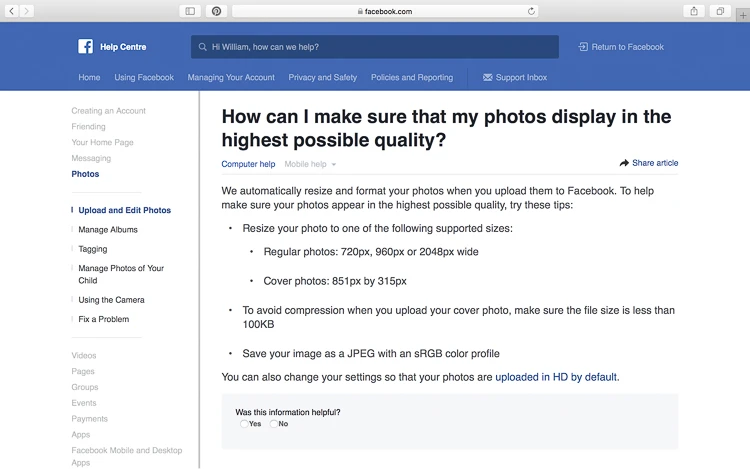
Sadly, not every platform uses the same optimum image settings. And with so many social media platforms and online galleries available to you, this could mean a lot of optimizing if you want your images to look their best across all platforms.
You could literally spend more time creating and optimizing different versions of your images than you did editing them.
Luckily, in the Export dialog, Lightroom allows you to create Export Presets that can speed up this process so you are not wasting time adjusting image sizes. Instead, you can use Export Presets to ensure your images look (almost) as sharp and beautiful on social media as they do in your Lightroom Library.

I have documented two ways you can optimize images for Facebook in Lightroom and create an export Preset in Lightroom Classic. This applies to other social media sites as well.
Method one: “Can you please do it for me?”
Sure. I’m here to help push you to craft beautiful images and nothing takes the jam out of my doughnut faster than seeing your work eaten up by compression algorithms.
So, to ensure your images look their absolute best across every social media platform, I have put together a library of individual Lightroom Export Presets for Facebook, 500px, Twitter, Instagram, Flickr and Print that I want to share with you – for free. Just click here to download them.
Method Two: Learn how to create social media Export Presets in Lightroom.
If you’re reading this then you chose the right method.
I say this honestly. Not because I don’t want you to enjoy all of the free goodies in the download, by all means you can still do that here. But because I want you to learn.
Anyone can hit download, install the Presets and be done with it. But what happens when Facebook or Flickr changes its settings? How will you know how to create or edit the Export Presets?
You see, I want you to be able to edit, update and know what’s happening with your workflow. This way, you can adapt to the ever-changing landscape and continue to publish awesome work – no matter how ugly and intimidating the image-compressing-wood-chipping-algorithm-machine looks.
Here’s precisely how to do it.
Step One: Locate Optimum Image Settings
Visit your social media’s support page to find its recommendations for optimum image sizing. Alternatively, you can use google to help you. In this example, we will work with for uploading a regular image to your timeline.
Facebook’s Recommendations:
- Regular photos: 720px, 960px or 2048px wide
- Save your image as a JPEG with an sRGB colour profile
Step Two: Virtual copies
In some instances, your social media platform may have a particular image ratio that it uses to display images. An obvious example here is the way Instagram primarily uses a 1:1 (square crop) ratio.

In these situations, it’s a good idea to navigate to your desired image in your Lightroom Library and use the keyboard shortcut Control + ‘ (PC) or Command + ‘ (Mac) to create a virtual copy of your image. Virtual copies are a great way to make a duplicate of your image without taking up significant hard disk space.

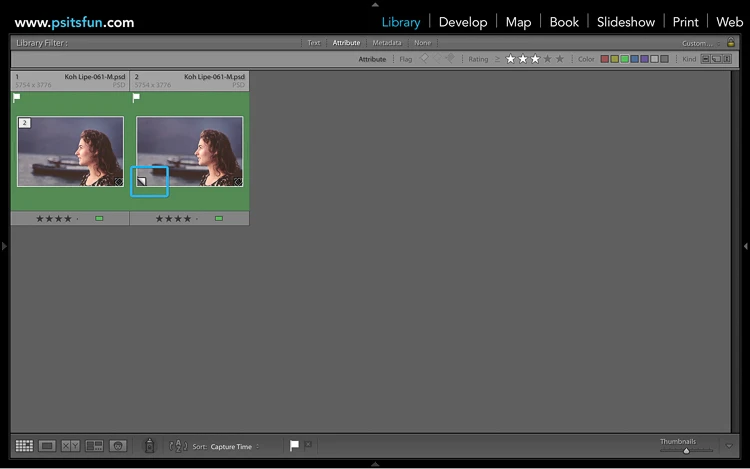
With your virtual copy selected, press ‘D’ on your keyboard to enter the Develop module, followed by the letter ‘R’ to enter the Crop tool. Adjust the Aspect of the crop to match the ratio of your social media platform and crop your image accordingly.
Given that Facebook does not specify a particular image ratio for a regular image other than a width of 2048px, you do not necessarily need to crop your image to optimize images for Facebook.
Step Three: Create Export Preset
With your image in the right ratio and armed with the optimum settings you can now create an Export Preset and publish your image.
To get started, use the simple keyboard shortcut ‘G’ to head back to your Lightroom Library. Select your image and click ‘Export…’
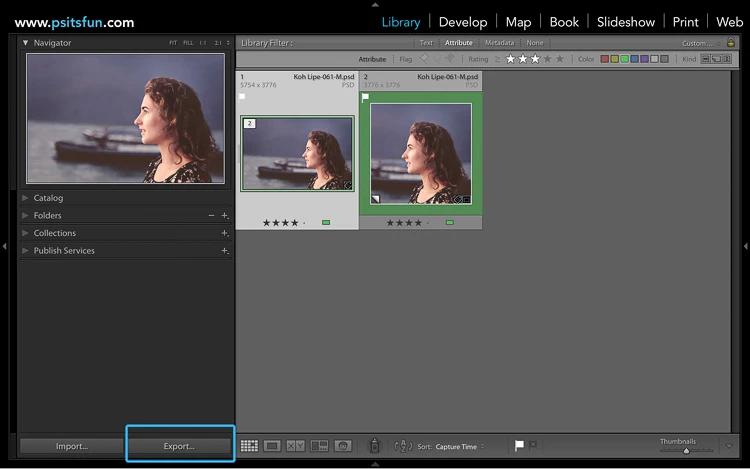
This will bring up the Export window. This window allows you to insert the optimum settings of your social media platform.

Export Location
The first section is the Export Location. Here you can select the option to ‘Choose folder later’. This means that Lightroom will prompt you to choose the ‘Save’ destination of your final image when you click ‘Export’.
In the existing files option select ‘Ask what to do’.
File Naming
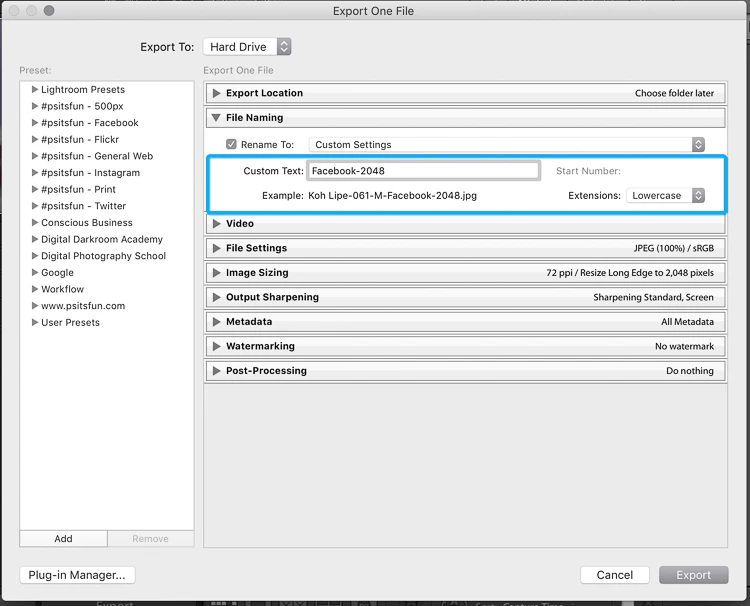
In the File Naming tab, you can use whatever method you prefer for naming your exported files. I like to use a custom setting that combines the original filename with some custom text.

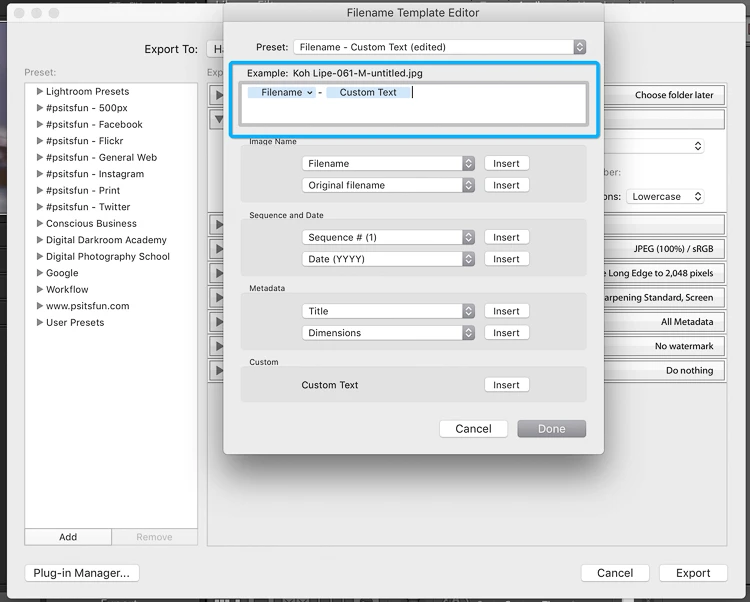
Here you can see that by using this setting, Lightroom keeps the original filename intact and simply adds my custom text “Facebook-2048” to the end.
File Settings
The File Settings is where you insert the ‘social media specific’ optimum size requirements for your image. Facebook has specified optimum settings of a JPEG format saved with a sRGB colour space.
Note: For optimum image quality, I prefer to leave the quality setting to 100.
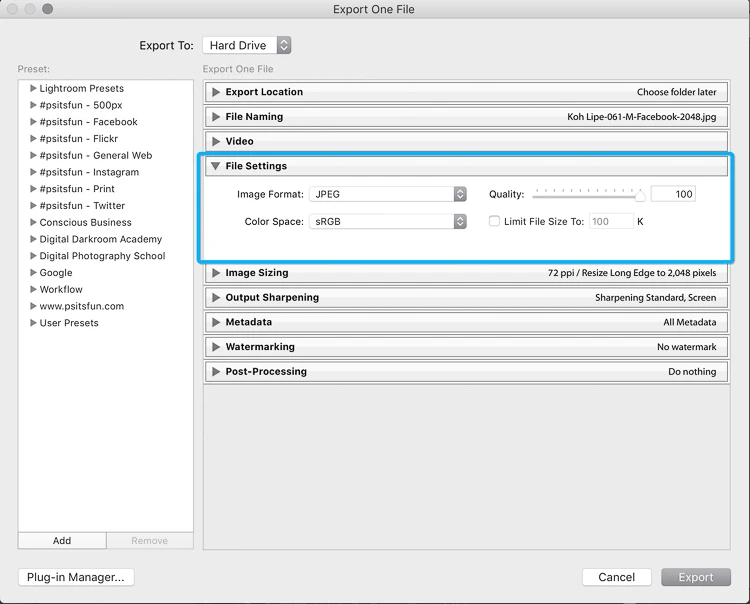
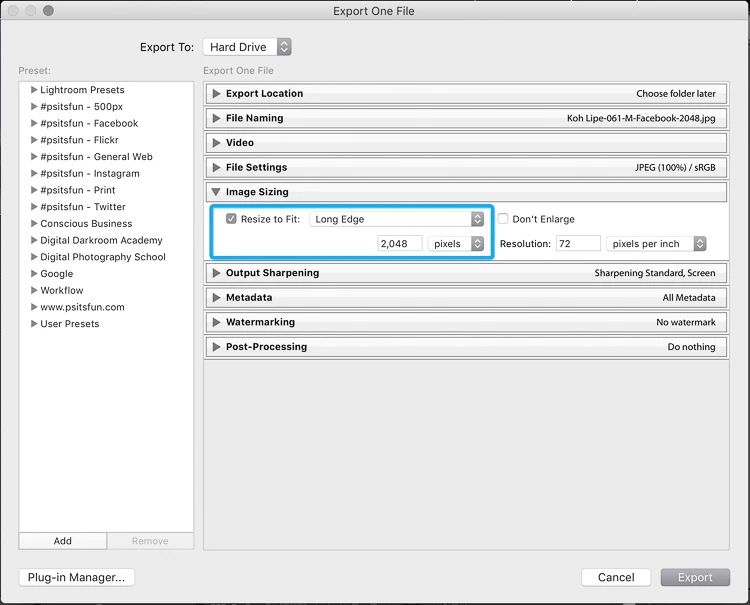
Image Sizing
Again, simply refer to your ‘social media specific’ optimum size requirements and update the settings to match accordingly. In this example, Facebook has specified a width of 2048px. To set the width, simply select ‘Longest Edge’ and enter 2048px to optimize images for Facebook.
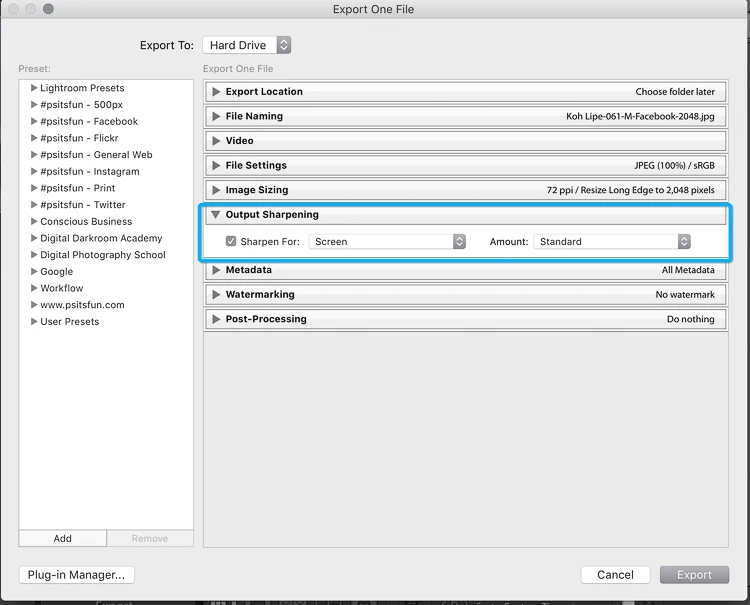
Output Sharpening
Lightroom is capable of applying a global sharpening adjustment to your images. In truth, this comes down to preference and may require you to do tests with and without this setting to see what you prefer.
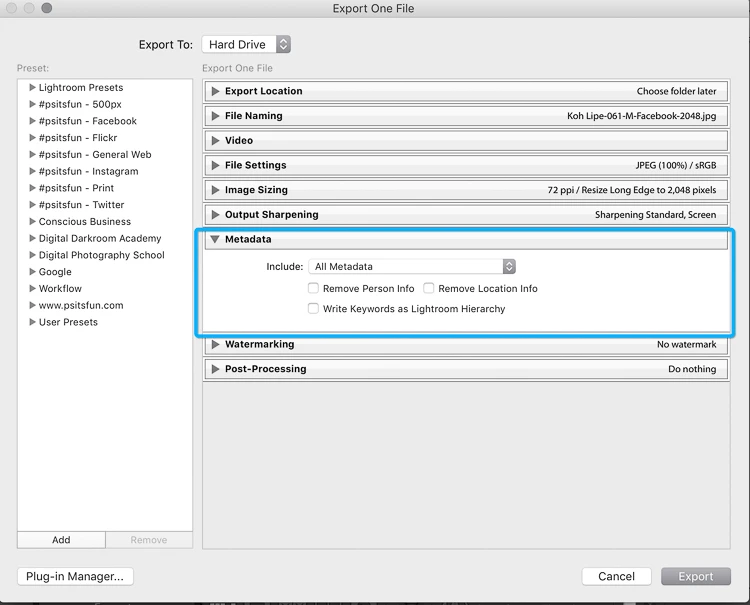
Metadata
Include all metadata – it’s worth reminding you here to keep your metadata Preset up to date.
Save as Preset
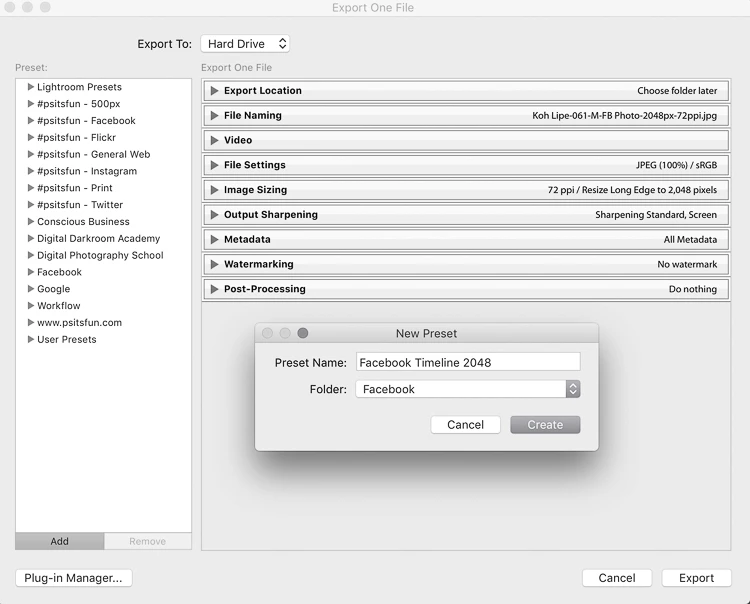
To save yourself the headache of repeating this process each time you want to publish images to your Facebook timeline, you can save the settings to create a ‘Facebook timeline’ Export Preset.
Simply click ‘Add’, choose or create a folder to save your Export Preset into, give it a name and click ‘Create’. You will now be able to see your Export Preset listed in the export window.
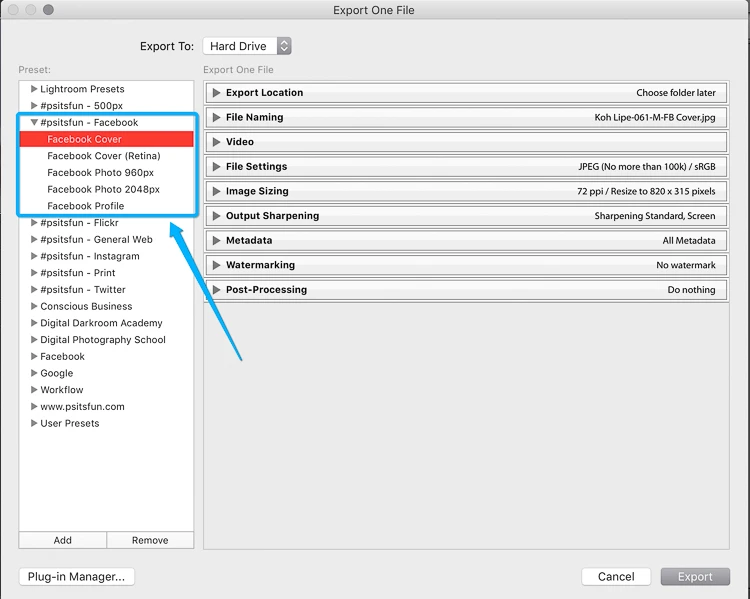
Export a photo
To export your images so that they are optimized for Facebook, you can now simply click on your Facebook Timeline Export Preset and click ‘Export’.
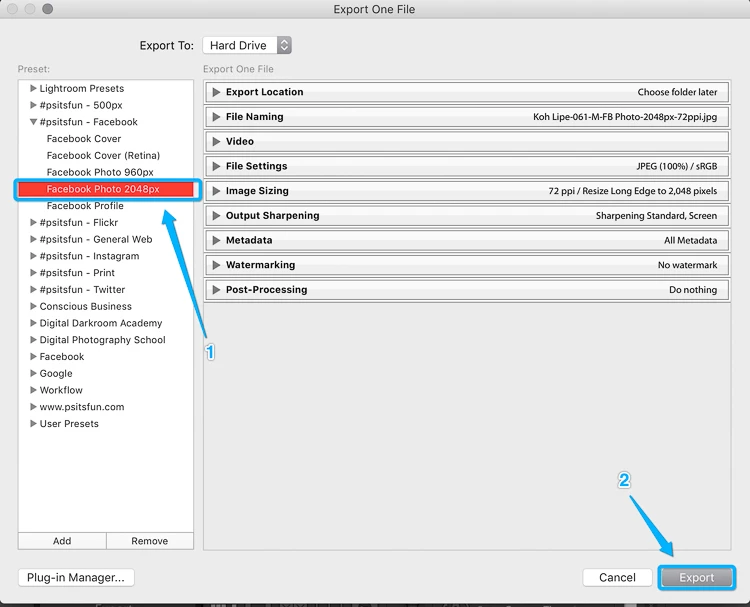
Lightroom will then ask you where you would like to save the image. Simply choose your desired destination and voila. You can now navigate to Facebook to upload the image knowing that it will look (almost) as good as it does in your Library.
BECOME A LIGHTROOM NINJA!
GET CONFIDENT WITH LIGHTROOM
THE COMPLETE LIGHTROOM COURSE
Learn how to use Lightroom to get organized, create amazing photos and cut your editing time in half.
Recap
Making sure your images meet the requirements of your social media platform is crucial to ensuring your photographs escape the clutches of compression algorithms and look their best at all times.
While the sheer volume of online galleries and platforms can make the idea of optimizing your images seem endless, using virtual copies and Export Presets removes the headache and reduces the ‘admin time’ when it comes to publishing your images online.
It does take a little time and research to set up and stay up to date with the various social media platforms. If you want a head start, download my free social media Lightroom Export Presets here. It includes presets which can optimize images for Facebook, 500px, Twitter, Instagram, Flickr and Print.
DOWNLOAD
The Ultimate Quick Start Guide for Lightroom
If you're just getting started with Lightroom, it can seem a bit too much. Where do you even begin? In this free guide, I will take you step-by-step through the fundamentals of Lightroom so you can feel more confident.






This is going to be really helpful to me. Great post!
Thanks for popping by Trevor!
Great to hear that you’ll find it useful. Please let me know if you have any questions.
Will